Pages

Tuesday, February 21, 2012

Metallic Dresser Refinish Project

I was on the search for furniture for the baby's nursery and I was able to get a set of antique dressers from my Grandmother, which were nice wood and in decent shape but needed refinishing badly.


So, I started by removing the handles and doing some test painting.  I knew I wanted a metallic finish, something with some sparkle!  I tested the Rust-Oleum Metallic Accents paint from Menards (by the way, they sell small sample jars of the colors which is great to test with before committing to a color) as well as the Ralph Lauren Candelight Finish Metallic coating from Home Depot.  I also tried them with some primer options and brush/roller options, until I came up with my favorite look.


 I decided on the Rust-Oleum Metallic Accents paint from Menards in the color Metallic Sea Shell.  I would also do some antiquing on top of the paint as well.  I also chose not to use a primer.

Rust-Oleum Metallic Accents Paint in Sea Shell

Then, it was time to start the sanding.  I started with a very rough sandpaper to remove the extra shiny finish on these dressers.  I then, used a 150 medium grit sanding sponge.  I followed that with a fine grit sanding sponge.  Lastly, I used an extremely fine sand paper just to make it very smooth.  I wiped the dressers down a lot and got rid of all of the dust that the sanding made, make sure they are very clean.

Now, to start the painting.  The paint calls for a 1/4" nap roller for a textured finish or a brush for a smoother finish.  I also tried a foam roller which gave a bubbly finish, and a Ralph Lauren Rag Roller.  I chose the Ralph Lauren Rag Roller (pictured below).  It gave a very nice texture which made the metallic paint stand out.  I did 4 coats, letting it dry thoroughly between coats.  I needed all 4 coats since I did not use a primer and I did not want the wood to show through.

Ralph Lauren Rag Roller
After the 4th coat dried, I used a small stencil brush to add some dimension and antiquing.  I used Rub 'n Buff in Antique Gold and Silver Leaf.  I applied them separately around the edges of drawers, any indents, and corners and then rubbed them with an old soft washcloth until they appeared soft and blended.  I kept working it around the piece bit by bit until I was happy (note: do small sections at a time).  I then added a thin 5th coat of the metallic paint on top of the Rub 'n Buff in order to make it appear even softer of a finish.
Stencil Brush
Close up of finish.

Then, I had to work on the handles, which were marked brass.  I soaked them in some warm water with dish liquid first and got them clean and let them dry thoroughly.  Then, made a mixture of the Rub 'n Buff with mostly gold and a hint of the silver and applied with the stencil brush to the handles and rubbed and buffed it until they shone beautifully.
Rub 'n Buff

Close up of handles.

 I then screwed the handles back on, and was so proud of how they turned out.  I loooooooove them!  A perfect amount of shimmer and shine (pictures do not do it justice).

After

After


Wednesday, February 15, 2012

Freezer Friendly Meals for After the Baby Comes

Well, I have started making plans for the baby to arrive, even though she isn't coming until early May.  I like to have as much set as possible, to make it an easier transition.  I do remember that one the of the hardest things was having a hot meal ready for dinner every night after feeling exhausted and overwhelmed, and this is my 1st pregnancy with having 2 other children to care for.  So, I started making some freezer-friendly meals.  I make myself a cooking day where I prepare a few meals, and I also have certain dinners where I just double up on the recipe so I can freeze half.  I find it takes the same amount of time to cook twice as much, just a bigger pot or pan is needed.

I have already prepared and frozen family sized portions of:
  • Spinach and Sausage Manicotti
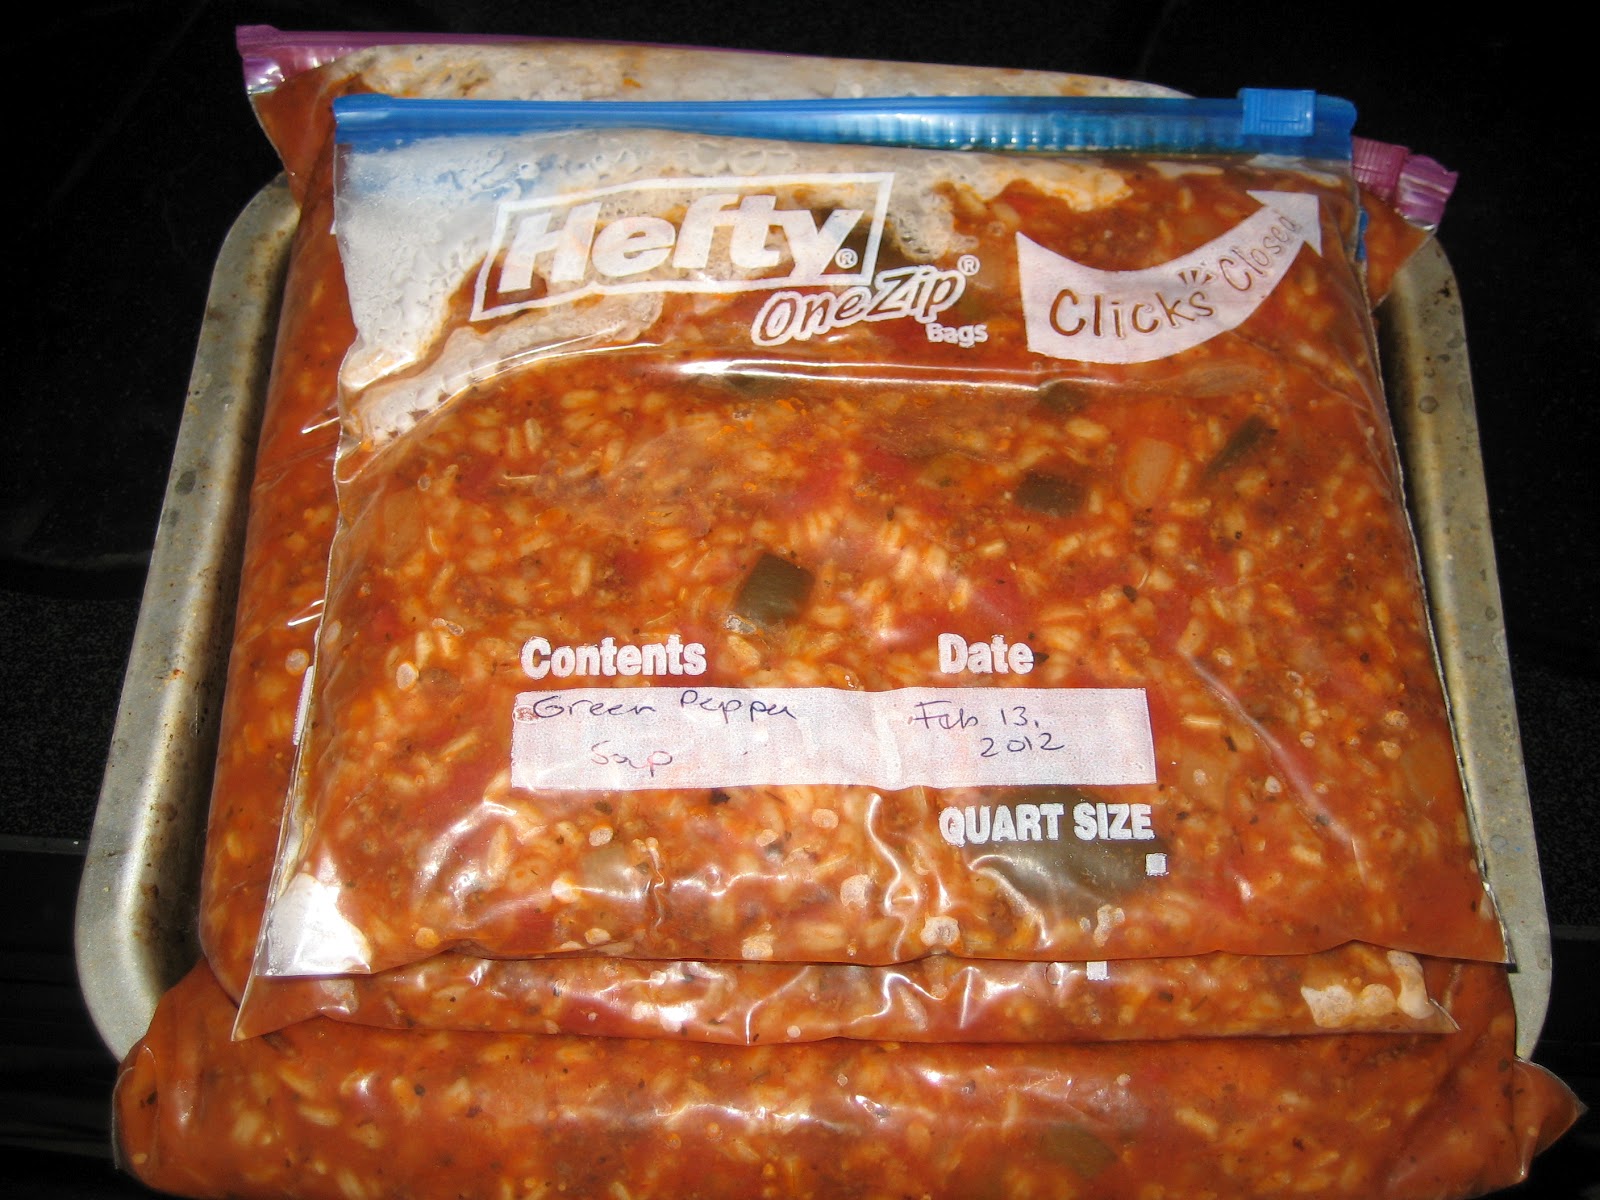
  • Stuffed Green Pepper Soup
  • Bean Soup with Smoked Pork Butt
  • Beef Chili
  • Chicken Chili

I am in the process or planning on making:
  • 2 batches of sausage corn chowder
  • 1-2 batches of baked ziti pasta
  • 2 batches of my famous Southwest Chipotle pasta sauce (a spicy roasted red pepper and garlic cream sauce) along with frozen chopped veggies so they are ready to prepare in minutes.
  • 2 batches of taco meat already seasoned and I will have taco kits ready in my pantry.
  • I will be purchasing 4-6 par-baked ponza rottas (like calzones) from our favorite place Jimmy's Grotto in Waukesha.  I freeze them, then let thaw in refrigerator for a day, bake for 30 minutes or until heated through and done!
  • Frozen Gyro kits (all I need is some fresh cucumber and tomato and about 10 minutes to make).
I have also frozen some smaller batches of lunch-sized portions of some of the items where I had a little extra.  These make easy, quick lunches for my husband to take to work, since he usually eats the leftovers from the night before.

One thing to remember is to cool the items properly and quickly, I use an ice bath for my freezer bags, then put them on the patio or in the cold garage for a bit to cool off (in the winter).  I lie them flat so they freeze that way, and store much easier.  I also mark the bags with what is inside plus the date I froze it, since they typically taste best within 3 months.  For items like the Manicotti, I freeze in oven-ready pans so I don't have to transfer them and make a mess.


If anyone wants any recipes or suggestions, just ask!  I'd also love some new recipes if you have any great ones to share.

Tuesday, February 14, 2012

Irritable Uterus?

For all the pregnant mommies, in case you experience anything like this, I wanted to share what I know about Irritable Uterus.  I must admit that I had never heard of such a thing until I was 22 weeks pregnant (I am 27 weeks now) and was having very regular fast coming contractions for an entire weekend, although the hospital advised me against coming in since it was too early in my pregnancy and it would be considered a miscarriage at this point.  I tried resting on my left side, walking, taking a hot bath, drinking a ton of water and nothing worked.  I went in to see my OBGYN the following Monday, where they checked my cervix which was nice and thick still, ran some tests to check for infections and dehydration, that might have brought on contractions and found nothing.  They then told me it is probably an irritable uterus. What? I said.  They explained that some uterus from stretching or over growth can become irritated and cause contractions that feel very real.  They do make you have a slightly higher risk of pre-term labor, but it is typically not the underlying cause.  I was put on strict bed rest until I reached 24 weeks, viability of the baby.  I still rest quite a bit because if I do too much, they do come back, and they have started hurting my back lately as well, getting more painful each time I get them.  They are very different from Braxton Hicks contractions, which I know very well after 3 pregnancies, which are milder and much more sporadic. These contractions were less than 2 minutes apart and lasting over a minute long.  They lasted almost a full 2 days, progressing on the 2nd day.  You feel them over your entire belly rather than just a portion.

One thing I do remember, is that since the beginning of my pregnancy my uterus has measured 3-5 weeks ahead of the baby's gestation age/size.  At my 24 week ultrasound, my uterus was at 28-29 weeks, they just keep saying it is an enlarged uterus and nothing of concern, as the baby will grow into in, but the baby never has, I am consistently every month ahead.  I wonder if it is enlarged since my last child, my son was a 8 pounder.  Or, is my baby actually older but measures smaller, since my due date was detected by a measurement ultrasound, as I did not know when I became pregnant.

I would love to hear your stories or information on this subject.

For more information, check out the wesbite dedicated to Irritable Uterus or check out BabyZone.

My Ultrasound from December 2011.  It's a Girl!

Friday, November 25, 2011

Good Luck for Black Friday Shopping!

I typically Black Friday Shop every year.  I was less enthusiastic this year since I am so tired from being pregnant and I really had most of my Christmas shopping done already.  I did make an attempt though, I headed to Walmart about 9:30pm last night to try and get some of the 10pm deals.  When I got there, it was packed with people, and everything was sealed in cases - a mad house.  I did happen to find everything I was looking for in the aisles, but the mounds of people waiting out the clock to grab everything was just a bit too much for me this year, plus every item I wanted was in such a limited quantity - the $7.97 kids jeans, there was 1 small rack of mixed sizes.  So, I left the store to head home and go to bed and get some rest instead of fighting for deals.  My plan was to wake up early and hit Menards for some deals this morning, and my 7-year old daughter wanted to come with me - but with my son keeping me up most of the night, I decided to sleep in.  I still could not get motivated, so instead I hopped online.  I was able to find some great deals plus free shipping from many of the Black Friday retailers, and I only missed out on 2 items I wanted.  Kmart was my favorite, they had lots of stock leftover and plus Free shipping on orders over $49 - and their website was nice and fast, a few website seemed slow with lots of heavy traffic.  Overall, I saved gas and a few headaches but still got some nice deals - so I am happy!  Hope your Black Friday Shopping was as good as expected!


My best Black Friday Deal Find
My best find were work boots and snow boots for my dear husband.  His work boots are falling apart and he has never had snow boots for shoveling the snow - so these were a GREAT buy from Kmart's online Black Friday Sale - both 50% off plus FREE Shipping.  $17.49 each.
Kmart.com - Coleman Men's Alpine Boot $17.49 plus FREE Shipping

Kmart.com - Structure Men's Kasper Fur Lined Winter Boot $17.49 plus FREE Shipping

Monday, November 7, 2011

Wedding Planning - Theme Selection

I am planning my sister-in-law's wedding for next July.  Many ideas have been discussed and colors changed, and we finally came up with a theme that is absolutely perfect for her....peacock and zebra!  I know, it's hard to believe, but it is going to be absolutely fabulous.

The main colors will be bright blue, deep purple, green-gold, and with small touches of black and white zebra.


The locations and providers have been booked and we have almost everything purchased so far - we are way ahead of schedule, which is exactly where I like to be.  Our next steps are arranging all the florals and designing the cake.

I'll update you as we progress, with all of our FabMom ideas!

Friday, November 4, 2011

FabMom Dinner Idea - Slow Cooker Pulled Pork with Easy Black Beans and Rice

FabMom's Slowcooker Pulled Pork

This is a slowcooker recipe you can start in the morning and have a delicious pulled pork when you get home.  You will want to start this no later than 11am to make sure it is done and tender by dinner time.

You will need: pork shoulder, canola oil, salt, pepper, BBQ sauce, flour, can of dark soda.

Step 1 - Take a nice pork shoulder (a very inexpensive cut of meat) and season with salt and pepper and a light coating of flour on one side.  Get a fry pan hot with a tablespoon or two of canola oil, and sear the pork on one side.  While searing, season the unseasoned side with the salt, pepper, and flour.  Turn and sear each side of the meat.  This is not a necessary step, but I find it makes it so much more tender (you can skip this and just season with salt and pepper).

Step 2 - Place the seared pork shoulder right into your crockpot.  Add 1 can of dark soda (Pepsi, Coke, Rootbeer or Dr. Pepper).  Top with about 1/2 cup of your favorite BBQ Sauce, I prefer smoky sweet with my pork.  Special Note: Do NOT use a diet soda unless you are ok with the aftertaste.

Step 3 - if you are home all day:
Now, if you will be at home, I recommend the high setting for half the day, then use a fork to pul the meat apart using 2 forks, removing the extra fat and any bones (usually 2 or 3) and turn it on the low setting for the second half of cooking.  I also typically turn it off for the last 30 minutes to cool down a it with the top ajar, so it's not piping hot for my hungry impatient kids.

Step 3 - if you will not be home all day:
If you plan on being gone all day, then simply start it early and set it on low.  When you return home around dinner time, use 2 forks to shred it and remove the fat and bones and let it cool a bit with the cover slightly ajar with the power off.

Serve with your favorite BBQ Sauce.


FabMom's Easy Black Beans and Rice

You will need: rice, can of black beans, salt, pepper, something spicy like cajun season, cayenne or crushed red peppers, canola oil, butter, and diced fresh tomatoes (optional).

Step 1 - cook some rice according to package directions.  I prefer slow cooking brown rice for its extra fiber and nutrition, but any rice will do.  To serve a family of 4, I use 3/4 to 1 cup of dry rice with twice that amount in water plus a dash of canola oil and salt.

Step 2 - To a hot fry pan, add 1 tablespoon of canola or olive oil and 1 tablespoon of butter.  Add 1/4 cup of onions (white or yellow) and cook until translucent.  Add in 1 can of drained and rinsed black beans.  Season with some garlic powder, dried oregano, salt, and something spicy like cajun season, cayenne or crushed red peppers (to taste).  Cook until beans are warmed.

Step 3 - Add the rice into the pan and heat through.  If it gets to sticky, add a dash of oil or water.

Step 4 - If you have any, I like to add 1/2 cup or so of diced fresh tomatoes to the top right before serving.


The Perfect Dump Cake for your Little Truck Lover... a Dump Truck Cake

I remembered another cake idea I wanted to share.  It is the perfect fun cake for your little truck lover or construction worker little man.  My son was and still is huge into trucks, cars, trains, and anything with wheels.  I considered buying a decorated cake at first, since I would have enough to do with the cooking and transporting the food to the park for the party, but I decided to try something new.  I love "dump cake", the kind you make in a trifle dish, and that was my inspiration.  I purchased a brand new metal dump truck, which became one of my son's birthday gifts - this is the big one and cost me about $20.  I sanitized the truck in the dishwasher on hot to make sure it was free from any dust or chemicals.


I baked a Pillsbury brand chocolate cake in a rectangular cake pan, and let it cool thoroughly and cut it into squares.  I prepared a large box of Jello brand Instant Chocolate Pudding.  I used a layer of aluminum foil inside the truck and a layer of plastic wrap on top of it, and taped it to the sides.  This helped with cleanup and kept it very sanitary.  I layered the chocolate cake cubes and the pudding throughout and made it look like a mountain of dirt in the back of the dump truck.  To transport and carry it without the truck separating, I put it on a large cookie sheet with some colored tissue paper for fun.  I scooped the Dump Truck Cake using a clean plastic sand shovel and served it in bowls with a scoop of vanilla ice cream.  It was D-E-L-I-C-I-O-U-S!  It was a hit and it was completely gone before the party was over.

Yeah, I see some little fingers in the ice cream! he he he

How to make a homemade Disney Cars Theme Cake

My son, and my nephew share their birthday week, and I made an adorable Disney Cars themed cake for their 3rd Birthday party this past May - they each took a turn blowing out the candle.  It was so simple to make and turned out adorable, I just had to share it.


First, I baked a Pillsbury brand box cake mix in a rectangle cake pan with a few additions of lemon rind, a about 2 teaspoons of lemon juice and a dash of real vanilla.  I used a store-bought can of Pillsbury white whipped frosting.  I separated the frosting into 2 bowls using 1/3 in the first bowl, and the remaining 2/3 in the second bowl.  I used a hand mixer on low then med-high speed to fluff the frosting and also to mix the colors.  The hand mixer fills the frosting with air and allows you to use much less and still get the taste you desire without the cake being overly sweet.  The smaller bowl I used a mixture of red, green and blue food coloring until I achieved a grey color similar to a road.  The larger bowl, I used a green and a lime green food color to get a nice bright green for the grass.  I started with the grey color, and made a curvy "T" of frosting on the cake using just a butter knife, starting with a thin crumb layer, then adding some more frosting.  I then filled in the rest of the cake with the green color to the sides.  I then added blueberries along the road line to create a separation of colors and to also hide any imperfections in my lines.  I used 3 yellow mini M&M's for each of the road lines.  I added 3 of my sons Daisey Cars die cast vehicles (sanitized first in the dishwasher).  For fun, I used a package of Cars themed fruit snacks to add some to the corners of the roads.  I used corkscrew candles which turned out so cute.  It was a hit, as you can tell by the look on my sons face (the blondie).


Thursday, November 3, 2011

An American Girl Doll Tea Party at Home

For my daughters' 7th Birthday, last January, she really wanted to have it in Chicago at the American Girl Store, they offer wonderful and very posh parties.  If you have noticed the prices on their parties, they can get quite expensive, not to mention a very long car drive from our part of Wisconsin into Chicago with a car-load of girls - not my cup of tea.  So, we decided to have an American Girl Tea Party in the comfort of our own home.

For the invites, we printed invitations on blank white card stock using our laser printer.  For the outside, we added American Girl paper flower cutouts and American Girl Doll stickers, both sold at Michael's stores.  We asked girls in an adorable poem to bring their dolls and to dress for a fancy tea party.  I apologize, I cannot find the extra invites to put a photo up, but as soon as I locate them, I will add that.  Lastly, I added a note that bears were also welcome, in case any girls did not have any dolls to bring.

For decor, I used pink curtains from my daughters bedroom as well as some pink  ribbon and pink crystal ornaments from her Christmas tree to make our chandelier more elaborate and girly.  Then, I used some table linens I had around the house and layered them.  I found beautiful non-matching pillow cases from a thrift store, which I used as chair covers.  I bought a pink antique water pot from the thrift store and filled it with silk flowers in pinks, whites and yellows.  The gift bags were pink paper bags from Michael's store and I used American Girl letter stickers to put the names on each bag (purchased from Michael's).


For table settings, I used a beautiful china set that was donated by my mother-in-law, otherwise nice sets can be found at thrift stores for very little money.  I also used my fancy champagne flutes for that special touch.  I bought fancy paper napkins from my local TJ Maxx and used some napkin rings I had from a previous party.  For the doll party attendees, I used toy tea sets at each place setting, so the dolls were part of the party as well (this was a Disney Princess set from Target).


For beverages, I served sparkling apple juice in the champagne flutes.  Each teapot on the table contained different beverage options, including the pink V-8 Fusion Smoothie in Strawberry Banana, warm apple cider, and a caffeine-free peach tea.  The doll teapots contained water, the girls just had fun pouring it.

At each place setting was a small bowl with 3 apple slices, a pink cream cheese fruit dip (cream cheese, brown sugar, vanilla, and red food coloring), as well as a toothpick skewer of bananas and blueberries as a starter. I then offered the rest of the items plate-by-plate table side service, including all-pink candy dish, tiny heart shaped tea sandwiches using tortillas (which makes them easy to cut using metal cookie cutters), warmed butter croissants, mini wieners wrapped in croissants and cheese) and thumbprint sugar cookies with a Hershey's kiss melted in the middle (basic sugar cookie dough rolled in a ball, pressed with your thumb in the middle with a Hershey's kiss), and heart shaped sugar cookies.


The girls had a blast at the tea party, and they all behaved marvelously.


 For additional fun, the girls made picture frames.  We used pre-cut frames, that I pre-painted before the party so they were dry.  The girls added jewels, stickers, drawings using glitter pens, and added their names in fancy foam letters to the frames as well as a ribbon loop for it to hang on a wall.


 We took photos using our Polaroid camera of the girls with their dolls, and taped them into the frames, and it became a take-home keepsake.  They also kept their gift bags filled with fancy lollipops, stickers, jewelery and other candies.


For dessert, I made wonderful cupcakes with a fresh whipped cream frosting tinted pink, of course.  I put it into a ziploc bag, snipped the corner and made beautiful flowing swirls on the top of the cupcakes.  So light and airy, you can eat 2 or 3.  I found candles in letters and spelled out my daughters name with one letter per cupcake.


Overall, the party was an absolute success, the girls who attended still talk about our famous doll tea party.

Oh, and my daughters adorable pink with black polka dot dress is from Kmart, and came with a matching dress for her America Girl doll - they matched at the party! This dress isn't available anymore, but they do offer others at great prices.

Tuesday, November 1, 2011

Walmart's Christmas PRICE Guarantee!!!

Have you seen the new Walmart Christmas PRICE Guarantee yet?  From November 1st, 2001 through December 25, 2011, if you find a lower price at a local retailer on an in-stock identical item, Walmart will give you the price difference in a gift card.  For me, that means shop NOW and get everything at Walmart, and before Christmas, go and get my free money gift cards to spend in January.  I am a DEAL SHOPPER, like a crazy nut deal shopper.... I like to find the best deals, so I am sure I will be getting some money back.  Hope this little nugget of gold helps you out for your Holiday Shopping.  FYI - I am already half way done with my shopping!  Have you started yet?  Less than 53 Shopping Days Left.

Have you ever been to a Dove Chocolate Tasting Party?

I had never heard of Dove Chocolate Tasting Parties, until I was invited to one just recently.  If you haven't been to one, you MUST host a party or make a friend host it so you can attend.  They are a fun girls night in, and you get to taste and sample many different offerings from their catalog....ummm lots of chocolate!!!  It's worth it just for the chocolate fondue, trust me - oh and did I forget to mention the Chocolate Martinis, which I could not try because I am preggo.  They have items for the experienced baker, the non-baker, for the savory cooks, and the drinkers ;).  Their catalog also has some excellent gift ideas, and the hostess gifts are pretty nice for hosting a small party with your girlfriends you've been meaning to catch up with anyways.  I bought some Christmas gifts and a few items for myself from the party and am thinking of hosting my own party after the Holidays.  If you would like more information about hosting your own party, please feel free to contact the wonderful woman who did an amazing job at the party I attended, Mary Adashek.  You can reach her at 262-375-1797 or email her at chocolatecoveredsuccess@yahoo.com --- Please tell her I (Stacy Hormann of FabMomsBlog) sent you.  She services Ozaukee County, WI and also a few surrounding areas, or go online at http://www.dove-chocolate-discoveries.com to find a party host in your area.

Monday, October 31, 2011

Welcome Fab Moms!

Welcome FabMoms to my new Blog!  I wanted to start writing as a outlet to share my interests and experiences with others.  I worked as a Project Manager and Operations Manager for many years managing businesses and working with people, and now I am a stay-at-home FabMom with baby #3 on the way.  I hope to share a lot with you and also look forward to what I can learn from you as well.